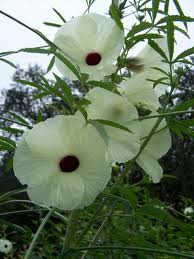

The kenaf hibiscus (Hibiscus cannabinus) is an attractive flowering plant that typically is cultivated for more practical uses. Its tough, fibrous strands make it ideal for creating rope, sacking, building materials and even for the backing of carpets. The origin of kenaf hibiscus isn’t known, although it is believed to be indigenous to Africa, Asia, the East Indies and/or Australia. It is currently cultivated throughout the world for making paper products. Kenaf hibiscus can be grown from seed outdoors as soon as the soil temperature has reached at least 55 degrees Fahrenheit.
Difficulty: Moderate
Instructions
Things You’ll Need:
- Kenaf hibiscus seeds or seed pods
- 1-gallon pots
- Potting mix
- Basin or 5-gallon bucket
- Brush
- Paper sack
- Rototiller
- Amendment
- Fertilizer
- Planting stakes
- Measuring tape
Preparing the Seeds and Planting Area
-
Collect the seed pods from an established kenaf hibiscus. The pods are ready for removing when they are dry and begin to show signs of cracking open.
-
Split open a pod to remove the seeds from the pods.
-
Clean the seeds thoroughly. Rinse them in cool tap water and use a small brush to clean them. You may also rub the seeds against wire screening to clean them.
-
Set the seeds in a paper sack to store until you are ready to plant them. They should remain viable for eight months.
-
Prepare the planting area in late spring (late March or early April) for summer planting. Work the planting bed to a depth of about 8 to 10 inches, using a rototiller.
-
Spread a 4-inch layer of aged cow manure, dehydrated compost or peat moss over the planting area. Work the amendment into the soil thoroughly. Level and smooth the planting area, using a metal rake.
-
Distribute a nitrogen-based fertilizer such as 12-12-12 at the spread rate of 1 to 2 lbs. for every 100 square feet of planting area. Incorporate the fertilizer into the soil, using the rototiller. Keep the area weeded until planting time. Plant between early May and early June.
Planting and Growing Kenaf Hibiscus
-
Create 3-foot-wide rows in the planting area. Use a measuring tape and planting stakes to measure and mark the distance apart for each row at about 3 feet.
-
Poke 1-inch-deep holes down the center of each row. Keep each hole about 1 foot apart.
-
Plant one seed in each of the planting holes. Cover the seeds with about 1 inch of soil.
-
Moisten the seed bed thoroughly, using a fine mist type of spray over the area. Push in a planting stake at the start and end of each planted row to indicate the area for watering. Germination can begin in about 10 to 14 days, depending on conditions.
-
Weed the planting area thoroughly during the first month after the kenaf hibiscus seeds germinate. Once seedlings grow to about 1 foot in height, fertilize every three weeks, using an all purpose fertilizer such as 15-15-15. Follow the directions specified by the product’s manufacturer as to spread rate.
Tips & Warnings
-
If you are growing kenaf hibiscus for pulp products, harvest during the flowering period, usually 90 to 125 days after planting.
-
Water the kenaf hibiscus approximately once a week, soaking the soil so the moisture can reach the roots.
Deprecated: strpos(): Passing null to parameter #1 ($haystack) of type string is deprecated in /home/agriviek8Qv/agriviet.net/public_html/wp-includes/comment-template.php on line 2522