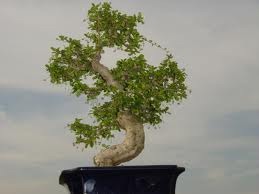
 As all plants grow, their root systems become more extensive and spread out through the soil. With plants in a container, the roots will reach the boundaries of the pot, filling the soil and choking off the supply of water and nutrients to the plant. When this happens, it has said the pot has become ‘pot-bound,’ and it will need to be repotted. Typically, with a regular potted plant, it will be repotted into a larger pot to allow the root system room to expand and reach fresh soil. With bonsai, after spending much time carefully choosing the correct pot to accentuate the tree and suit the size of the plant, it will need to be repotted into that same pot.
When the Bonsai becomes pot bound, or the roots are circling the center of the rootball or coming out of the drainage holes, it is time to repot. The amount of time it takes for this to happen depends on, once again, the species of plant. This can be anywhere from one to several years. The best time of year to repot a Bonsai is while it is dormant; the tree at that time is less dependent on the root system for nutrients. The plant will also need time to recover from the repotting and accompanying root pruning, so it is best done while the plant is dormant but not long before it becomes active again.
After it is determined that the plant needs to be repotted, the first step is to gather all needed materials before removing the plant from the pot. The amount of time the roots are exposed to the elements should be minimized. Necessary tools include new growth media (to be discussed in detail in the next section), plastic mesh, wire and tools.
When ready, the pot should be tipped while holding on to the plant and the base of the trunk. The sides of the pot may need to be tapped to coax the plant out. After the plant is removed from the pot, the old soil must be removed from the rootball. Carefully shake out any excess soil, then comb the roots as described in the pruning section. There are specially designed root hook tools available for the job, but fingers or a pointed stick will also work. Any long, coiled roots that will need to be pruned should be straightened out as the excess soil is being removed, taking care not to damage the smaller roots that remain.
The rootball should be inspected for any rotten or dead roots. These will appear crumbly and black, and they should be removed. After the roots have been pruned, it is time to prepare the pot for repotting. First the plastic mesh over the drainage holes should be replaced. Then a layer of the new soil should cover the bottom of the pot. Some soil should be piled up on this first layer where the plant will be placed. Once the plant is placed in the pot, care should be taken to be sure it is positioned correctly in the pot. Often, anchor wires are used to to keep the tree in place. After the plant is positioned, more soil should be added around the rootball. There should be no pockets of air, and at the same time the soil should not be too densely packed, as water will need to drain through it. After the pot is almost full of soil, it should be watered. This will most likely settle the soil some, more should be added as needed.
While most plants will have no problems after repotting, they should be observed carefully for six months to ensure they are recovering properly.
Deprecated: strpos(): Passing null to parameter #1 ($haystack) of type string is deprecated in /home/agriviek8Qv/agriviet.net/public_html/wp-includes/comment-template.php on line 2522