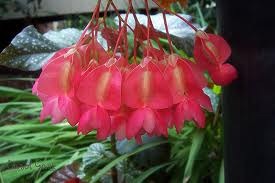

Angel wing, or cane, begonias are among the oldest and easiest grown types in the family. Although they grow in various sizes, all feature sturdy bamboo-like stems and bold, pointed angel wing-shaped leaves. Most angel wing begonias typically produce copious flower clusters that are often quite fragrant. These plants have been extensively hybridized over the decades but are still easy to root in water if you’d like to clone some of your favorites. Take cuttings any time your plant is actively growing.
- Difficulty:
- Moderately Easy
Instructions
things you’ll need:
- Clean, sharp knife or razor blade
- Small clear glass container
- All-purpose potting soil
- 4-inch pot
- Plant food
- Choose unblemished stems that have three to six leaf nodes for cuttings. Use a very sharp, clean knife or a razor blade to make a 45-degree cut about 1/2 inch below a node and 6 inches below the stem’s tip. Place the cut stem into cool water immediately.
- Remove all but the top two leaves from the stem, which is where the cutting will develop its major growth point.
- Submerge the lower half of the stem in a very small glass or jar with no more than 2 inches of water. Cuttings release their own natural rooting hormone into the water, so if the container is small, the hormone will be much more concentrated. A clear container makes it easier to monitor the cutting’s root development without disturbing anything.
- Set the cutting in a warm spot with lots of filtered light. A very bright windowsill is perfect, as long as the cutting is protected from direct sunlight. Provide at least 12 hours of light daily, if possible.
- Check your cutting’s progress each day and replenish the water as necessary to maintain the original volume. Replace it if it looks murky or smells bad. Tiny white dots should appear on the submerged part of the stem in about a week. These are tiny roots beginning to sprout. When the roots are between 1 to 2 inches long, you can move the cutting up to a small pot of soil.
- Fill a 4-inch pot about 3/4 full with all-purpose potting soil. Set the cut stem on the surface and gently spread the cutting’s roots out. Firm soil around the roots and base of the cutting gently. Water enough to evenly moisten the medium but not so much that it’s soggy or wet.
- Set the planted angel wing cutting back on its bright windowsill. It can moved outside well after all danger of frost has passed. Incorporate the new baby into whatever regular feeding schedule works well for you and your other angel wings.
Deprecated: strpos(): Passing null to parameter #1 ($haystack) of type string is deprecated in /home/agriviek8Qv/agriviet.net/public_html/wp-includes/comment-template.php on line 2522