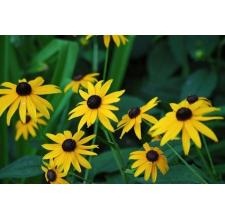

Black-eyed Susans — botanically known as Rudbeckia hirta — bloom from midsummer to autumn, and feature a daisy-like appearance, with sunny golden petals radiating from a dark conical center. The pleasing splash of color they provide makes black-eyed Susans a welcome addition to cottage gardens; they are particularly effective as border plants along a walkway. These hardy flowers can be started indoors from seeds in the late winter, and are ready to be transplanted outside after danger of last frost has passed.
Features
-
Depending on the variety, black-eyed Susans can be either annuals or perennials; most commonly, they are biennial, forming a rosette of foliage the first year and blooming the second. Their average height is from 18 to 36 inches; foliage is light-green, lance-shaped and attractive. Black-eyed Susans reseed easily, and over several years can form an attractive mass. Daisies, asters and chrysanthemums make suitable companion plants for these cheerful garden workhorses.
Requirements
-
Black-eyed Susans are hardy North American wildflowers that can be grown with a minimum of fuss. Drought tolerant when established, black-eyed Susans are also easygoing when it comes to soil, tolerating both clay and sandy soil as long as it is well drained; amending soil with compost can help your black-eyed Susans thrive. For best results and showiest blooms, plant them in full sun.
Seeding
-
Start your black-eyed Susans indoors 6 to 8 weeks before the last expected frost in your area. Using a commercial soil for starting seeds, fill a pot or tray to within a half-inch of the top. Free Garden Plants advises seeding 50 plants to a 3-inch pot; you can sow up to 200 in a full-size seed tray. Press the seeds gently into the soil, but don’t cover them. Lightly spray with a mister — being careful not to disturb the seeds — and set the container in a tray of water, removing when the surface of the soil becomes moist. Cover the container with clear plastic, and place in a bright room with a temperature of 59 to 68 degrees F; take care to keep it out of direct sunlight. After the seeds germinate and the seedlings are large enough to handle, transplant them 5 inches apart in seed trays, using a good quality commercial potting soil.
Transplanting
-
Transplant the seedlings outside when the danger of frost has passed, after a week of "hardening off" during which you place the container outside during the day for several days in succession. Loosen the seedlings from their pot or tray, and use a spoon or small trowel to make a hole in garden soil. Transplant the seedlings at the same level at which they were growing, firm soil around the base of the plant. Water well, and continue to keep the seedlings moist — but not wet — until they are established.
Deprecated: strpos(): Passing null to parameter #1 ($haystack) of type string is deprecated in /home/agriviek8Qv/agriviet.net/public_html/wp-includes/comment-template.php on line 2522