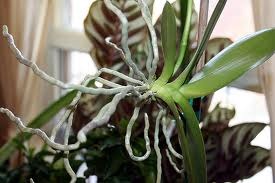

Orchids require a stable environment to thrive. They are not difficult to grow, they just have a specific set of cultural needs. Depending on the type of orchid you have, its blooming cycle can be once a year or more. They generally bloom for about one to three months, depending on the growing environment. During the downtime, your orchid will need some special care to get it to bloom again. If you provide the proper care for your orchid, you will be rewarded with a beautiful, healthy, flowering plant.
- Difficulty:
- Moderately Easy
Instructions
things you’ll need:
- Sharp scissors
- Orchid media mix (if needed)
- New Zealand sphagnum moss
- Orchid pot (if needed)
- Spray bottle
- Orchid fertilizer
- Check if your orchid’s roots are growing out of the drainage holes or if they are growing over the sides of your pot. If so, you will need to repot your orchid after the blooms fall off. You should repot orchids every year or two, or when the roots become too crowded.
- Remove your orchid from its pot to check the roots by gently tapping it loose. Untangle any roots that are holding it in place. Cut off any dead roots using sharp scissors. These dead roots will be brown and soggy. Healthy roots will feel hard and are green or white in color. Remove as much of the old bark as possible without damaging the healthy roots. Throw away the old bark.
- Rinse off the orchid’s roots by running them under lukewarm water. Check for any hidden dead or rotting roots. If you find more, cut them off.
- Rinse out your old pot or use a new, larger orchid pot. Place a layer of orchid bark mix in the pot, and add a layer of New Zealand sphagnum moss on top. Continue layering until the planter is half full.
- Gently place the the orchid into the pot, distributing the roots as evenly as possible. To plant and stabilize it, place some more orchid bark mix to cover the roots. Cover the exposed roots and top layer of bark with New Zealand sphagnum moss. Water your newly potted orchid thoroughly to moisten the moss and bark.
- Water your orchid thoroughly in the mornings once or twice a week. Watering in the morning helps avoid fungal growth. Once a day, spray the leaves, exposed root, bark and moss with water to keep the plant moist. Water more frequently if you live in a dry, hot climate.
- Fertilize the orchid once a week while you are watering it. Use a specialty orchid fertilizer, according to the manufacturer’s instructions.
- Place your orchid in an area that does not receive direct sunlight. Ensure the place you choose avoids direct air flow. For example, do not place your plant in front of an air conditioner opening.
- Keep the surrounding temperature at 50 to 65 degrees F during the night and 60 to 80 degrees F during the day. Familiarize yourself with the type of orchid you have so you can provide the optimum growing conditions.
- Inspect the plant daily for signs of decay, disease, insects or signs of damage. Treat any problems that you find.
Tips & Warnings
-
If your orchid is outdoors, re-pot it when you bring it in for the winter. This will get rid of insects or disease that may have taken up residence during the summer.
-
After the blooms fall off, you do not have to cut off the stem/spike until it turns brown. Once the color changes, cut the spike 1 inch from the base, using sharp scissors.
-
Do not over fertilize your plant. This can damage or kill your orchid.
Deprecated: strpos(): Passing null to parameter #1 ($haystack) of type string is deprecated in /home/agriviek8Qv/agriviet.net/public_html/wp-includes/comment-template.php on line 2522